目录一、创建容器1.下载模版2.上传模板到PVE3.新建LXC容器二、修改容器设置1.修改容器配置文件2.创建钩子脚本三、启动容器四、OpenWrt基本设置1.修改root密码2.
目录 一、创建容器 1. 下载模版 2. 上传模板到PVE 3. 新建LXC容器 二、修改容器设置 三、启动容器 四、OpenWrt基本设置 五、安装常用软件(根据个人喜好选择) 1、oh-my-zsh安装 2、阿里云ddns安装设置 3、zerotier安装设置 4、Server酱安装设置
一、创建容器 1. 下载模版 这里选择使用openwrt-21.02.0-rc3版本,rootfs包官方下载地址
2. 上传模板到PVE
3. 新建LXC容器 通过SSH或者是网页端打开PVE终端,执行以下命令创建新容器
pct create 100 local:vztmpl/openwrt-21.02.0-rc3-x86-64-rootfs.tar.gz --rootfs local-lvm:4 --ostype unmanaged --hostname OpenWrt --arch amd64 --cores 2 --memory 2048 --swap 0 -net0 bridge=vmbr0,name=eth0
各参数说明:
二、修改容器设置 1. 修改容器配置文件 vim /etc/pve/lxc/100.conf
添加以下内容
# openwrt.common.conf是PVE自带的openwrt配置文件示例,内含一些基本设置
2. 创建钩子脚本 这里在官方示例guest-example-hookscript.pl的基础上进行修改,大家可以根据需要自行修改
mkdir /var/lib/vz/snippets
在第36行可以找到以下内容
# Second phase 'post-start' will be executed after the guest
修改为
# Second phase 'post-start' will be executed after the guest
三、启动容器 执行以下指令
pct start 100
由于PVE7.0 默认采用cgroupv2,缺少对系统类型为unmanaged的容器支持,会出现以下错误
run_buffer: 316 Script exited with status 1
解决方法是修改/usr/share/perl5/PVE/LXC/Setup.pm文件
vim /usr/share/perl5/PVE/LXC/Setup.pm
翻到最后,可以看到以下内容
sub unified_cgroupv2_support {
修改为
sub unified_cgroupv2_support {
继续执行pct start 100指令启动容器,会出现WARN: old systemd ( container -> cgroup version. 警告,忽略就行。
如果还无法正常启动,可通过以下命令查看错误信息(日志保存于debug文件中)
lxc-start -n 100 --logfile debug --logpriority TRACE
四、OpenWrt基本设置 容器启动后,进入容器终端
lxc-attach 100
1.修改root密码 passwd
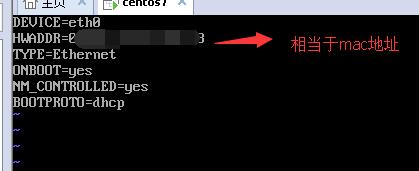
2.网络设置 vi /etc/config/network
修改如下内容(根据自己的实际情况更改)
config device
重启网络和防火墙
/etc/init.d/network restart
● 现在你应该能够上网,并能通过https://192.168.1.1打开OpenWrt页面了
五、安装常用软件(根据个人喜好选择) 为了避免一些异常情况发生,修改/etc/hosts,添加以下内容
185.199.108.133 raw.githubusercontent.com
安装一些基本软件和中文语言包
opkg update
1、oh-my-zsh安装 来源:https://github.com/felix-fly/openwrt-ohmyzsh
安装依赖
opkg install unzip zsh ca-certificates
安装
sh -c "$(wget -O- https://raw.githubusercontent.com/felix-fly/openwrt-ohmyzsh/master/install.sh)"
设为默认shell
which zsh && sed -i -- 's:/bin/ash:'`which zsh`':g' /etc/passwd
不想用时可以卸载
sh -c "$(wget -O- https://raw.githubusercontent.com/felix-fly/openwrt-ohmyzsh/master/uninstall.sh)"
2、阿里云ddns安装设置 安装ddns中文包和依赖
opkg install luci-i18n-ddns-zh-cn wget-ssl openssl-util
下载 update_aliyun_com.sh脚本
wget -O /usr/lib/ddns/update_aliyun_com.sh https://raw.githubusercontent.com/sensec/ddns-scripts_aliyun/master/update_aliyun_com.sh
3、zerotier安装设置 安装zerotier软件包
opkg install zerotier
设置
uci set zerotier.sample_config.enabled='1'
启动zerotier
/etc/init.d/zerotier start
查看状态
zerotier-cli listnetworks
显示信息类似以下格式
200 listnetworks
显示status状态是 ACCESS_DENIED,需要去ZeroTier Central设置通过。之后再执行zerotier-cli listnetworks显示status状态是OK就说明设置成功
修改防火墙设置
vim /etc/firewall.user
添加以下内容,其中ztxxxxxxxx更改为zerotier-cli listnetworks显示的dev项
iptables -I FORWARD -i ztxxxxxxxx -j ACCEPT
重启防火墙
/etc/init.d/firewall restart
4、Server酱安装设置 使用说明:https://github.com/tty228/luci-app-serverchan/
安装依赖,因为作者没有把luci-compat加进依赖库,需要手动安装(已安装的可忽略,比如安装dockerman的时候会自动安装luci-compat)
opkg install luci-compat
下载安装软件包
wget https://github.com/tty228/luci-app-serverchan/releases/download/v1.86/luci-app-serverchan_1.86-9_all.ipk
设置
按照提示和格式要求填写“企业微信凭证”


![猪猪猫.CNWINXPSP2电脑城装机12DVD[豪华版]](https://img.php1.cn/3cd4a/1eebe/cd5/dc7ef30f57b727c7.jpeg)


 京公网安备 11010802041100号